Five Fungi Worth Learning First and How to Be Sure
Mushroom identification rewards patience and precision. These five species are where careful learners begin.
Wild fungi occupy a different category of risk than wild plants. The consequences of a wrong identification can be severe, and the window between “this looks right” and certainty is wider than most beginners expect. That is why fungi were deliberately left out of the wild edibles sequence on this site. They deserve their own treatment, their own rules, and their own pace.
The good news is that the same principle applies here as it does with plants: start with species that are distinctive, widespread, and difficult to confuse with anything dangerous. Build your observation skills on safe ground before moving into territory where precision matters more.
These five fungi are taught in this order for a reason. Each one introduces a new identification skill that carries forward to everything you learn after it.
Eat only what you can identify with complete confidence. If any part of the identification feels uncertain, leave it. There is no shame in walking past a mushroom you cannot confirm. The skill is in the discipline, and the discipline is what keeps you safe.
Every species below should be confirmed using at least two independent field guides before you eat it for the first time. Cook all wild fungi thoroughly. Eat a small portion on your first try and wait 24 hours before eating more. Some people react to species that are broadly considered safe.
This article is educational and does not substitute for hands-on training with an experienced forager or mycologist. Tinder & Fern is not responsible for the identification or consumption of any wild species. The final decision to eat anything you find in the field is yours alone.
Why fungi play by different rules
Plant identification relies heavily on leaf shape, growth pattern, flower structure, and habitat. Those features are relatively stable across a species and tend to look the same from one specimen to the next. Fungi are less cooperative. A single species can look dramatically different depending on its age, moisture level, substrate, and growing conditions. A young chicken of the woods barely resembles an old one. A chanterelle in dry weather can look nothing like the same species after three days of rain.
Fungi also lack the familiar reference points that make plant identification intuitive. There are no leaves, no flowers, no root systems to examine. Instead, you are working with cap shape, gill structure, spore color, stem characteristics, and the material the fungus is growing on. These features require a different kind of attention, and the vocabulary takes time to internalize.
The species in this article were chosen because they sidestep many of those complications. Most are polypores or have features so distinctive that the identification is simple once you know what to look for. They are the training ground, and they are worth learning well before branching out.
1. Chicken of the woods
Laetiporus sulphureus and related species
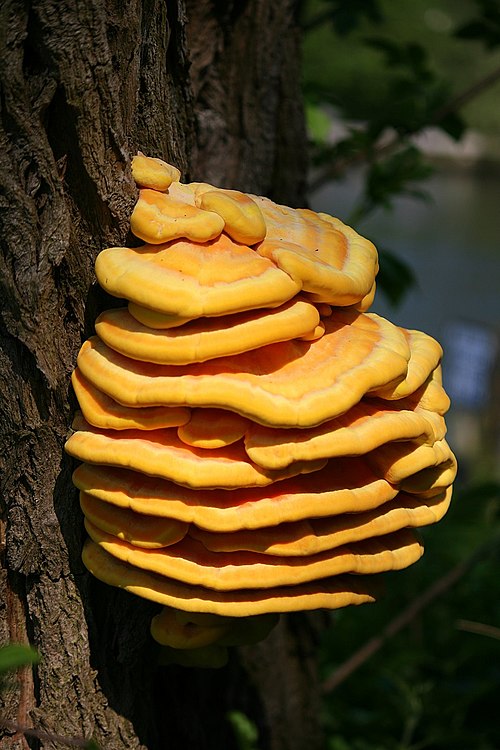
This is where most experienced foragers would tell a beginner to start, and with good reason. Chicken of the woods is a polypore, meaning it has no gills at all. The underside is covered in tiny pores rather than the blade-like structures you see on a typical mushroom cap. That single feature eliminates an enormous category of dangerous lookalikes right from the start.
The fruiting body grows in overlapping shelves on dead or dying hardwood trees, occasionally on conifers. When fresh, the color is unmistakable: vivid orange on top fading to bright sulfur yellow at the margins. The flesh is thick, firm, and white when sliced. Older specimens fade to pale salmon and become chalky and brittle. Eat them only when they are young, moist, and pliable.
The flavor and texture are mild and meaty. Sliced thin and sautéed in butter, it earns its common name. It takes well to any preparation where you would use chicken breast.
What you are learning
Chicken of the woods teaches you to identify a polypore, which means learning to flip a mushroom over and examine the pore surface. This single habit will serve you for the rest of your foraging life. It also teaches substrate awareness: what the fungus is growing on matters. Chicken of the woods on hardwood is the standard edible. Specimens growing on conifers, eucalyptus, or yew should be avoided, as some cause gastrointestinal distress.
What to watch for
There is no dangerous lookalike for a fresh, brightly colored chicken of the woods on hardwood. The combination of shelf growth, pore surface, and orange-to-yellow coloring is unique. The most common mistake is harvesting specimens that are too old. If the flesh is no longer moist and the color has faded to white or pale tan, leave it.
2. Hen of the woods
Grifola frondosa
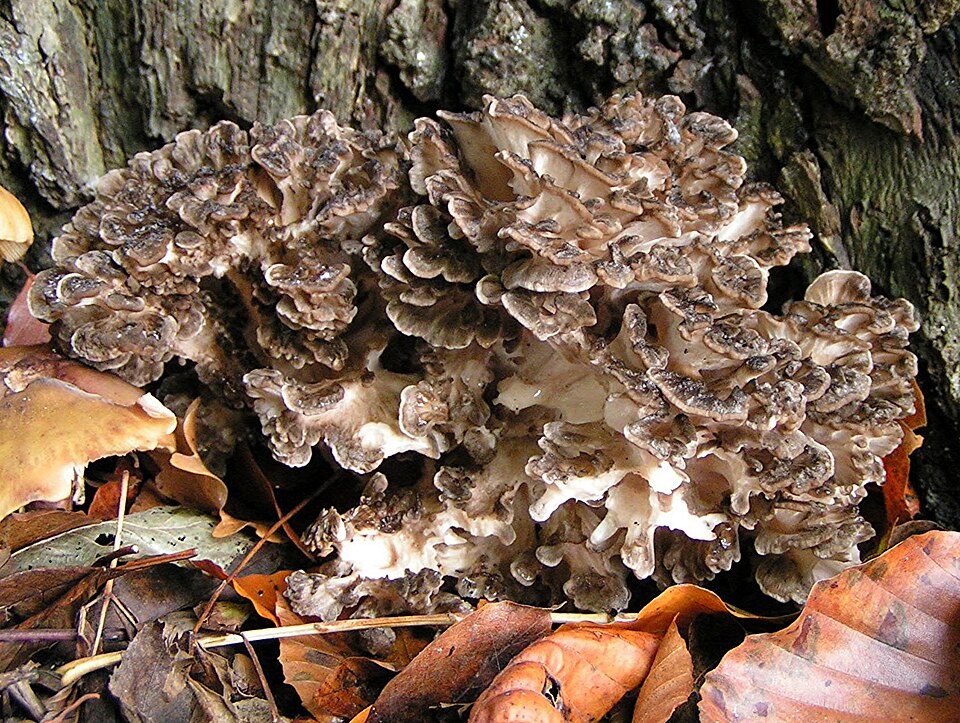
Also called maitake, hen of the woods is another polypore and another safe entry point. It grows at the base of oaks and occasionally other hardwoods, appearing in late summer through fall. The fruiting body is a dense rosette of overlapping gray-brown caps, sometimes reaching the size of a basketball. Like chicken of the woods, the underside shows pores rather than gills.
The caps are thin, fan-shaped, and slightly wavy at the edges. The color ranges from gray to brown on top with a white pore surface underneath. The entire structure grows from a single stem base attached to the tree roots. Hen of the woods is prized in the kitchen and commands high prices at farmers’ markets for good reason.
The flavor is rich and earthy with a firm texture that holds up to roasting and sautéing. Torn into pieces and crisped in a hot pan, it develops edges that rival anything from a good kitchen.
What you are learning
Hen of the woods reinforces the polypore identification skills from chicken of the woods but adds a new element: growth location. This fungus has a specific relationship with oak trees, and finding it means learning to read the forest floor around the base of oaks during the right season. Foragers who find a producing tree often return to it year after year, because the fungus will fruit in the same spot as long as the tree or its root system is alive.
What to watch for
Berkeley’s polypore (Bondarzewia berkeleyi) grows in similar locations and can look superficially similar. It is much larger, tougher, and has a different texture. The caps are thicker and the overall structure is less delicate. It is not dangerous, just unpleasant to eat. If the caps are thin, flexible, and gray-brown with white pores at the base of an oak, you are looking at maitake.
3. Chanterelles
Cantharellus cibarius and related species
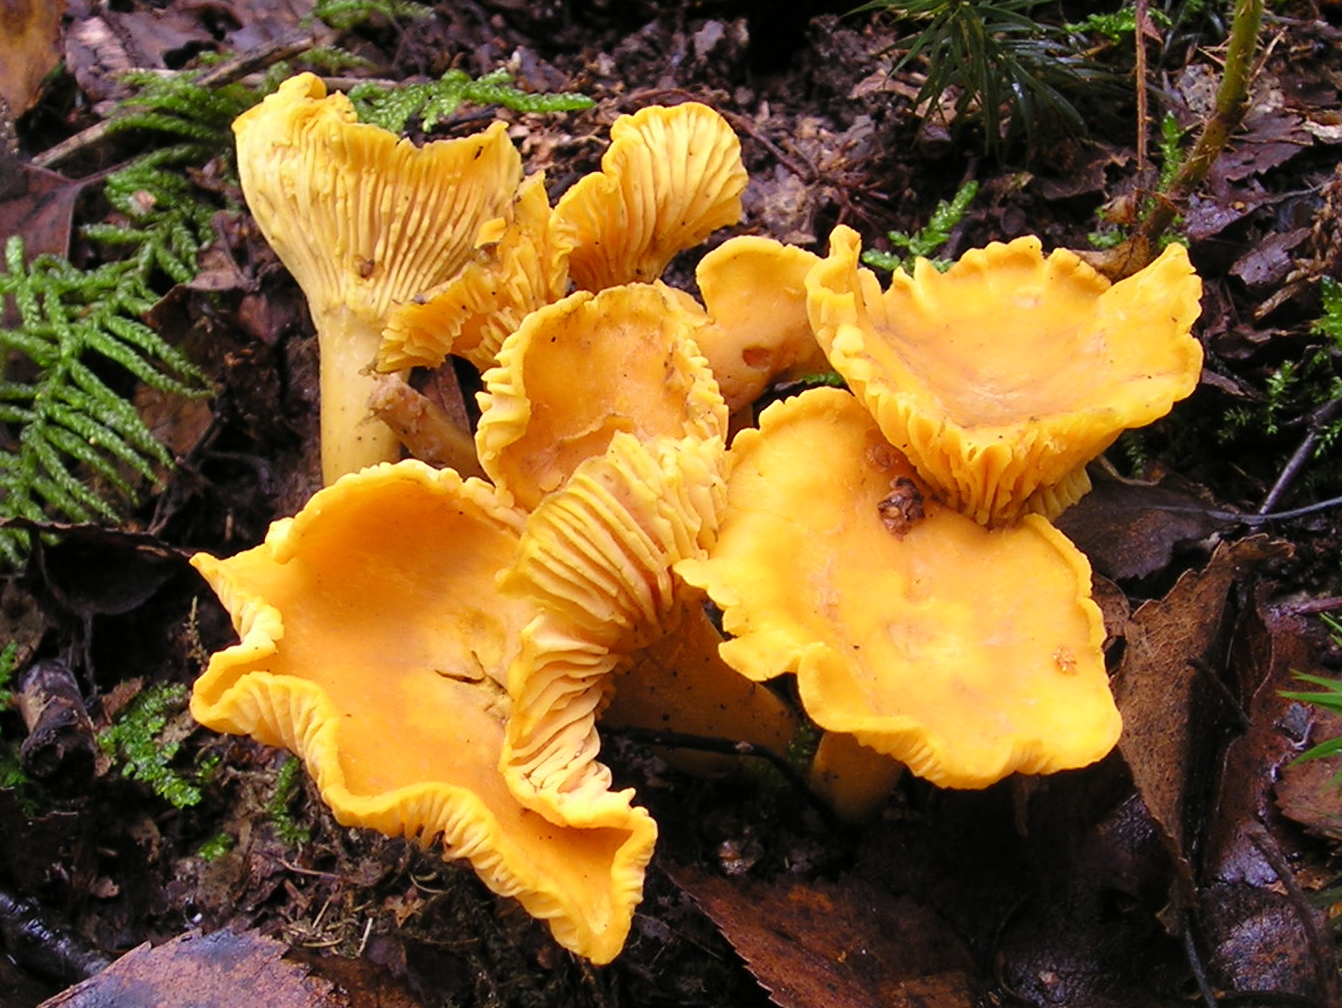
Chanterelles are the first species in this sequence that grows from the ground rather than from wood, and the first with structures on the underside that can be confused with gills. That confusion is exactly why they belong at this point in the learning order. Chanterelles do not have true gills. They have forking ridges that are shallow, blunt, and run partway down the stem. Learning to see the difference between true gills and false gills is one of the most important skills in mushroom identification.
The color is golden to egg-yolk yellow, sometimes paling to cream. The cap is vase-shaped or funnel-shaped in mature specimens, with a wavy, irregular margin. The flesh is white when sliced and has a distinctive smell that most people describe as faintly fruity, like apricots. They grow in hardwood and mixed forests, often in mossy areas, from summer through fall.
Chanterelles are among the most celebrated wild edibles worldwide. The flavor is delicate and peppery with that faint apricot note carrying into the taste. They pair well with butter, cream, eggs, and fresh herbs. Restaurants charge a premium for them, and finding your own patch is one of the real pleasures of foraging.
What you are learning
Chanterelles teach the distinction between true gills and false gills. True gills are thin, blade-like, and can be separated from the cap with a fingernail. False gills are rounded ridges that fork and merge and cannot be cleanly separated. This observation becomes critical as you move into more advanced identification, because gill structure is one of the primary features used to classify wild mushrooms.
Chanterelles also introduce smell as an identification tool. The apricot scent is subtle but consistent, and once you learn it, it becomes a reliable confirmation alongside the visual features.
What to watch for
The jack-o’-lantern mushroom (Omphalotus olearius) is the most commonly cited lookalike. It is orange rather than golden, has true gills that are sharp and blade-like, grows in dense clusters at the base of trees or from buried wood, and is toxic. The differences are clear once you know them: check the gill structure, check whether it grows in clusters or singly, and check the color. Jack-o’-lanterns are a deeper, more uniform orange. Chanterelles are golden, often with lighter patches, and grow scattered across the forest floor rather than in tight clusters.
Run your thumb across the underside of the cap. True gills feel like the pages of a book and can be individually separated. False gills feel like rounded, blunt folds that merge and fork. This is the single most useful test for distinguishing chanterelles from their lookalikes. Practice it every time you pick one, even after you are confident in the identification.
4. Giant puffball
Calvatia gigantea
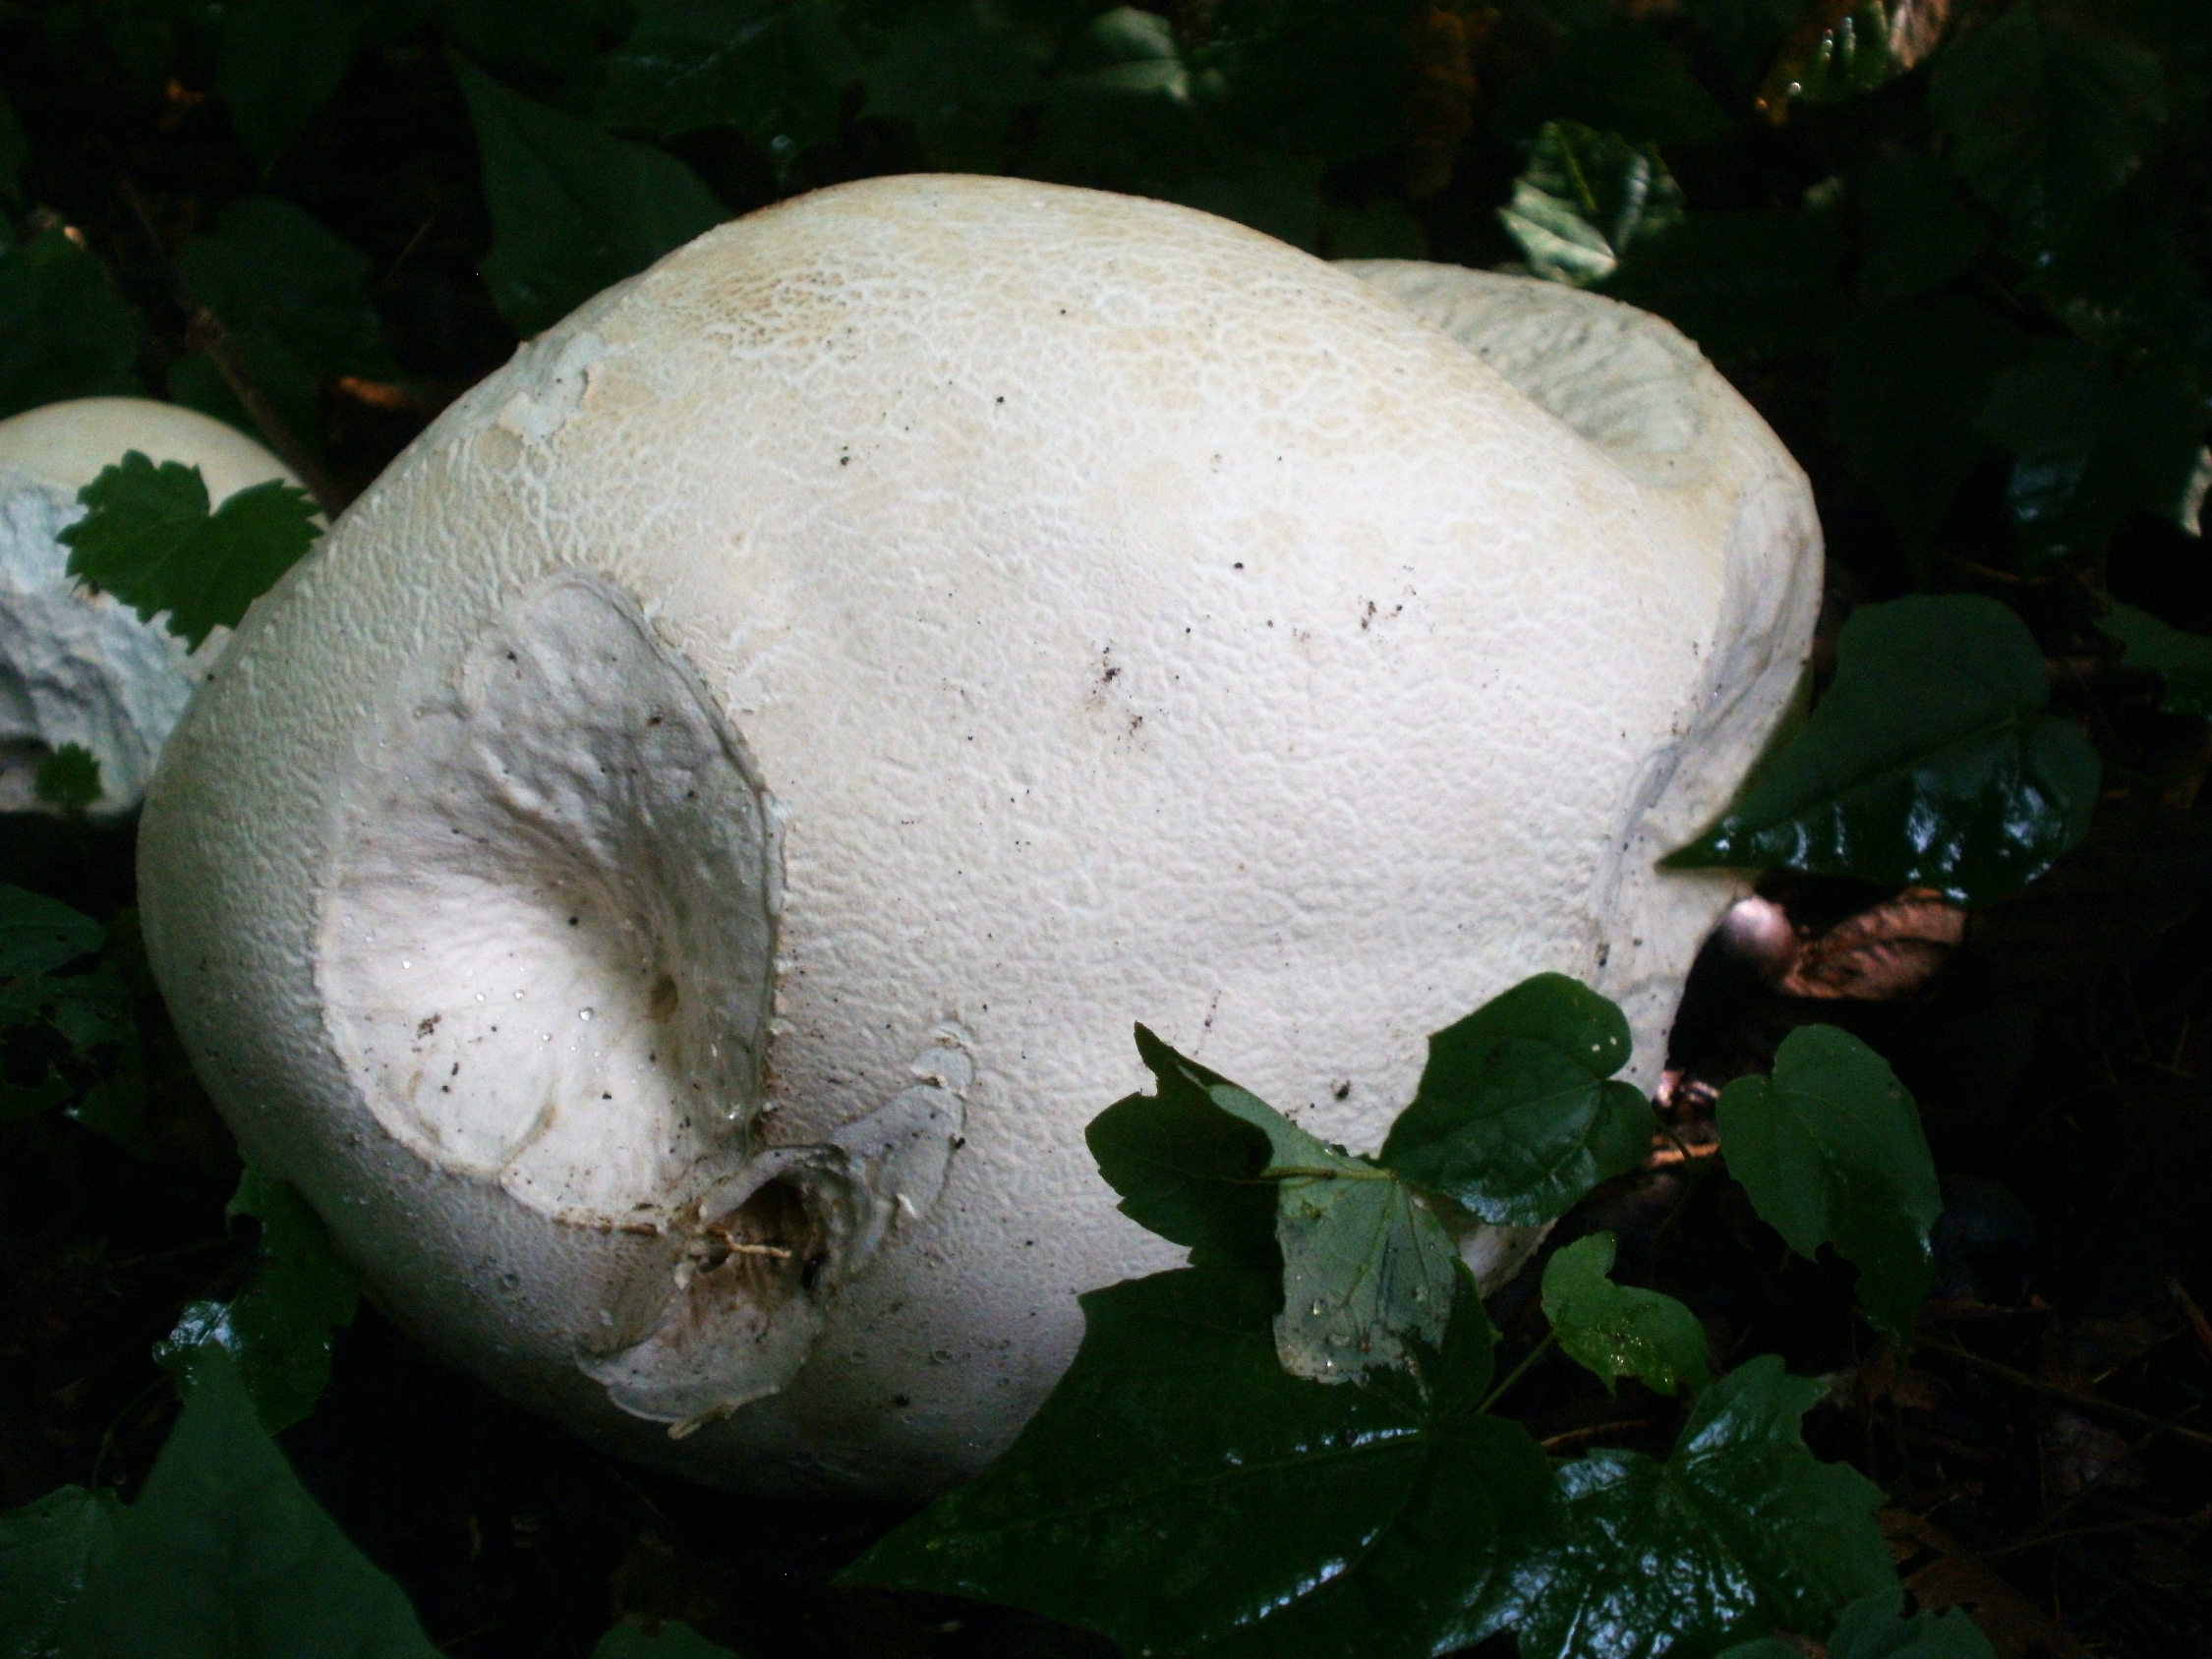
Giant puffballs can grow larger than a soccer ball. They appear in meadows, pastures, and open woodland edges from late summer through fall. The exterior is smooth and white, aging to yellowish-brown. There is no cap, no stem, no gills. The entire structure is a solid mass of flesh.
The identification rule is absolute: slice it in half from top to bottom. The interior must be pure white, uniform, and featureless throughout. If you see any discoloration, any hint of yellow or brown, any outline of a developing mushroom inside, do not eat it. A pure white interior with no internal structure is your confirmation.
The flavor is mild and absorbent, similar to tofu in its ability to take on whatever you cook it with. Sliced into thick rounds and pan-fried with oil and salt, it develops a golden crust with a soft interior. A single large specimen can feed several people.
What you are learning
Puffballs teach you to examine internal structure, a practice that separates careful foragers from casual ones. Cutting a mushroom open reveals information that the exterior does not provide. For puffballs specifically, it rules out immature specimens of other species, including Amanita, which in their earliest stage can resemble a small, round, white mass. A cross-section of an immature Amanita shows the outline of a cap and stem forming inside. A puffball cross-section shows nothing but solid white flesh.
What to watch for
Small puffballs require more caution than large ones, precisely because immature Amanita species can be similar in size and shape. The giant puffball is safest for beginners because its size alone sets it apart. If the specimen is smaller than a softball, the cross-section test becomes essential rather than optional. If there is any internal structure visible when you slice it open, discard it.
5. Morels
Morchella species
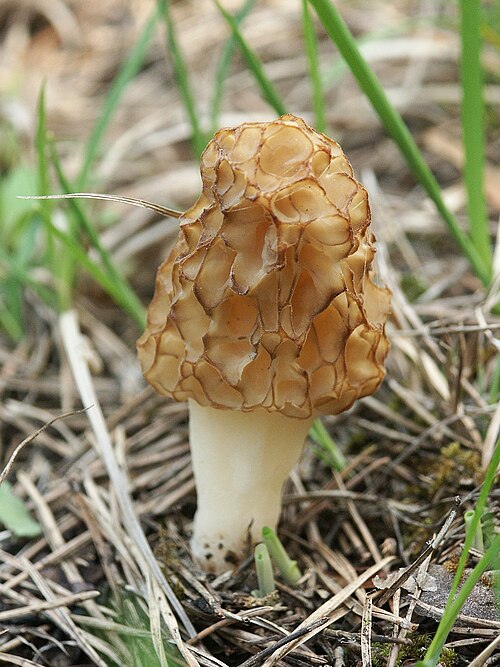
Morels are among the most sought-after wild fungi in North America, and they appear in spring when little else is fruiting. The cap is covered in a honeycomb pattern of deep pits and ridges, and the entire mushroom is hollow from the tip of the cap to the base of the stem. That hollow interior is the defining feature.
They fruit in spring, often in association with dead or dying elm and ash trees, in old orchards, on south-facing slopes, and in areas that burned the previous year. The color ranges from pale cream to dark brown depending on the species and age. They emerge when soil temperatures reach the right range and can appear in large numbers over just a few days.
The flavor is deep, nutty, and unlike any cultivated mushroom. Sautéed in butter with a pinch of salt, morels are one of the finest things the woods produce. They must be cooked thoroughly before eating, as raw morels can cause gastrointestinal distress.
What you are learning
Morels are placed last in this sequence because they introduce the most consequential lookalike lesson. The false morel (Gyromitra esculenta and related species) contains gyromitrin, which is toxic and potentially fatal. The false morel has a wrinkled, brain-like cap rather than the true morel’s honeycomb pits, and the interior is chambered or solid rather than hollow. Learning to tell them apart is a rite of passage in mushroom foraging, and it reinforces a principle that applies to every species you will ever identify: when a dangerous lookalike exists, you must know the exact features that distinguish the safe species from the harmful one.
What to watch for
Slice every morel in half lengthwise. A true morel is completely hollow from cap to stem, like a tube. A false morel has cottony or chambered tissue inside. The cap of a true morel is attached to the stem at the base of the cap. On a false morel, the cap often hangs free, attached only at the very top of the stem. These two tests, the hollow interior and the cap attachment, are definitive.
Cut the mushroom in half from top to bottom. A true morel is a single hollow chamber. The cap walls are thin and pitted. The stem is hollow. There is no cottony material, no chambers, no solid tissue anywhere inside. If what you see does not match this description, you are not holding a morel.
Building from here
These five species give you a working foundation in the skills that matter most: recognizing pore surfaces, distinguishing true gills from false gills, examining internal structure, and understanding the relationship between a fungus and its substrate. Every species you learn from here forward will use some combination of these same skills.
The next steps are personal. Some people move toward boletes, where the pore surface skills from chicken and hen of the woods translate directly. Others work on Hericium species (lion’s mane and its relatives), which are distinctive and safe. Oyster mushrooms are common and useful but require more careful attention to gilled lookalikes.
Whatever direction you take, the pace should be the same: one species at a time, confirmed with multiple sources, practiced until the identification is effortless. Speed is not the goal. Confidence built on careful observation is.
Tools and practices
A regional mushroom field guide is essential. National guides try to cover too much ground, and regional variation in fungi is significant enough that a book focused on your area will serve you better than a comprehensive reference. Look for one with good photographs, spore print instructions, and a key that walks you through gill attachment, cap shape, and substrate.
Spore prints are a skill worth learning early. Place the cap gill-side down on a piece of paper (half white, half dark works best), cover it with a bowl, and leave it for several hours. The color of the spore deposit is a powerful identification tool that becomes more useful as you advance beyond beginner species.
A local mycological society is the single best resource available to you. Most regions have one, most welcome beginners, and many organize group forays where experienced identifiers can confirm or correct your observations in the field. There is no substitute for having someone point at the mushroom in your hand and tell you exactly what it is and how they know. That interaction anchors the identification in a way that books alone cannot replicate.
The same deliberate approach that works for plant identification works here. Learn one species well. Then learn another. The forest floor opens up slowly, and that is exactly the right speed.
Five fungi, five skills
- Chicken of the woods: pore surface identification, substrate awareness
- Hen of the woods: growth location, seasonal timing, tree relationships
- Chanterelles: true gills vs false gills, smell as identification tool
- Giant puffball: internal cross-section examination
- Morels: hollow vs chambered interior, dangerous lookalike protocol